BIG CSS TUTORIAL
If you're like me, you want to make cool CSS codes, but are totally frustrated that all the people who know how to do it won't help you! Don't fear, RebellionLayouts is here! Hopefully you already know a little bit about coding. If not, that's okay! I'm going to do my best to teach you everything you need to know.
First thing's first. Start your layout with the following: <style type="text/css"> and put </style> at the end. Your entire code will go between these two items.
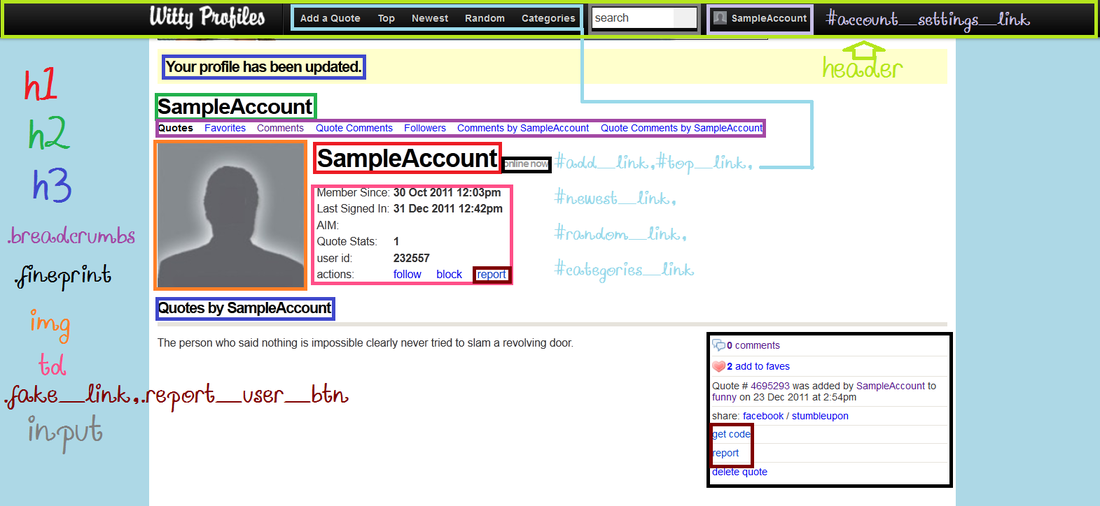
Click on the image to make it larger. This is your guide to making CSS layouts. Each item is color coded. If you look, you might notice that "Quotes by SampleAccount" is in a dark blue box. Simply look for the corresponding color on the left. h3 corresponds to "Quotes by SampleAccount." That means that h3 will control what "Quotes by SampleAccount" looks like.
Here is an example of a code:
<style type="text/css"> h3{color:blue;font-family:century gothic;font-size:15px;letter-spacing:1px;text-decoration:blink;}
Confused? That's okay! I'll explain each part of the code. As stated before, h3 controls "Quotes by SampleAccount," So that is the element that we are changing. Use a curly brace { before you change the element. color:blue tells the editor that I want the element text to be blue. font-family:century gothic tells the editor that I want the font to be century gothic. font-size dictates how big I want the text to be, letter-spacing tells how far apart I want each letter of the text, and text-decoration:blink tells the editor I want the text to blink. Each separate change to an element should be separated by a semicolon ;
You can include all or none of these in your code. If you don't want it to blink, then leave text decoration:blink out of the code. You can add other codes like text shadows or line height. Play around with codes until you get the effect that you like. These codes can be used with all of the elements above, like h2, .fineprint, so on and so forth.
Certain elements can only have certain things changed. For instance, the text in the header has to be changed by elements like #account_settings_link. You might wonder why you would use a header at all. Welcome to the wonderful world of opacity! Opacity can make your elements see-through. So if I used the code:
header{opacity:0.5;}
the header of my page would be partially transparent. You can change the number to make your element more or less opaque, 0.1 being very opaque, and 1 being not opaque.
Hover can make your profile look awesome. Let's say I made my header have an opacity of 0.5. Maybe I want it more clear when someone puts their mouse over it. I would use the following code:
header:hover{opacity:1;}
Note the "hover" after the element I am changing. This tells the editor that I want that element to change when the mouse is over it.
EXTRA CODES
THIS IS VERY IMPORTANT. You might have noticed that .breadcrumbs can change things like the letter spacing, but not the color. This is because these elements are links, and all links are changed by a separate code. Instead of using h3 or .fineprint, use:
a:link to change the properties of an unvisited link
a:active for a selected link
a:hover for a link that your cursor is hovering over
a:visited for a link that has already been visited
Got it? Good. I will probably be adding more advice to this tutorial depending on your guys' feedback. Please keep in mind that I don't claim to be an expert on coding, I'm more of a watch and learn kind of person. Feel free to ask questions in the comments below. If I get a lot of people asking a certain question, I'll probably add it to the tutorial. I hope this helped you guys!
Be sure to leave your WITTY USERNAME so I can respond to you.
HTML Comment Box is loading comments...
